When one of my friends gave me an invite to her wedding reception, I started to get a little excited. Way more excited than I normally would at the thought of having to make myself look presentable, leave the house and go and be sociable with people ?
I was excited because at the bottom of the invite it said ‘formal or Indian attire’. Indian attire means, gold (and lots of it), vibrant colours, and lots and lots of beautiful fabrics. Right up my street.
I asked the bride about what colours and styles I should stay away from – red is the colour for the bride, and white is mourning, but everything else is fair game. The brighter and richer the colours, the better, and I was explicitly told that more is more when it comes to bling. Earrings, necklaces, gold trim on your clothing, sequins, mirrors, the works. Full permission is granted to be as extra as you want.

I was told that lenghas are the wedding outfit for the ladies at Indian weddings, which were explained to me as a long full skirt and a cropped top. And yeah, it’s basically exactly that. With my hips, that long full skirt isn’t going to happen, and I’m not sure how I feel about the cropped top, either – so I started thinking about how I could make this work for me.
A little while later, a pattern popped into my head – Simplicity 1099, which I’d made the skirt from before. It had, funnily enough, a pattern for a cropped top too – which could mean I had my outfit 100% sorted without any research or spendage on patterns required ?? (and we all know what that means – more money to spend on fabric! ?)

I scoured Etsy and eBay for suitable fabrics – Indian brocades and jacquard being the subject of my searches. My colour scheme was loosely purple, pink and turquoise (obvs), with lots of gold. I didn’t want a pink top, because that would clash with my hair, but I wanted pink somewhere on the outfit because pink is DA BEST ?
I bookmarked several images as inspiration for colours and styles:

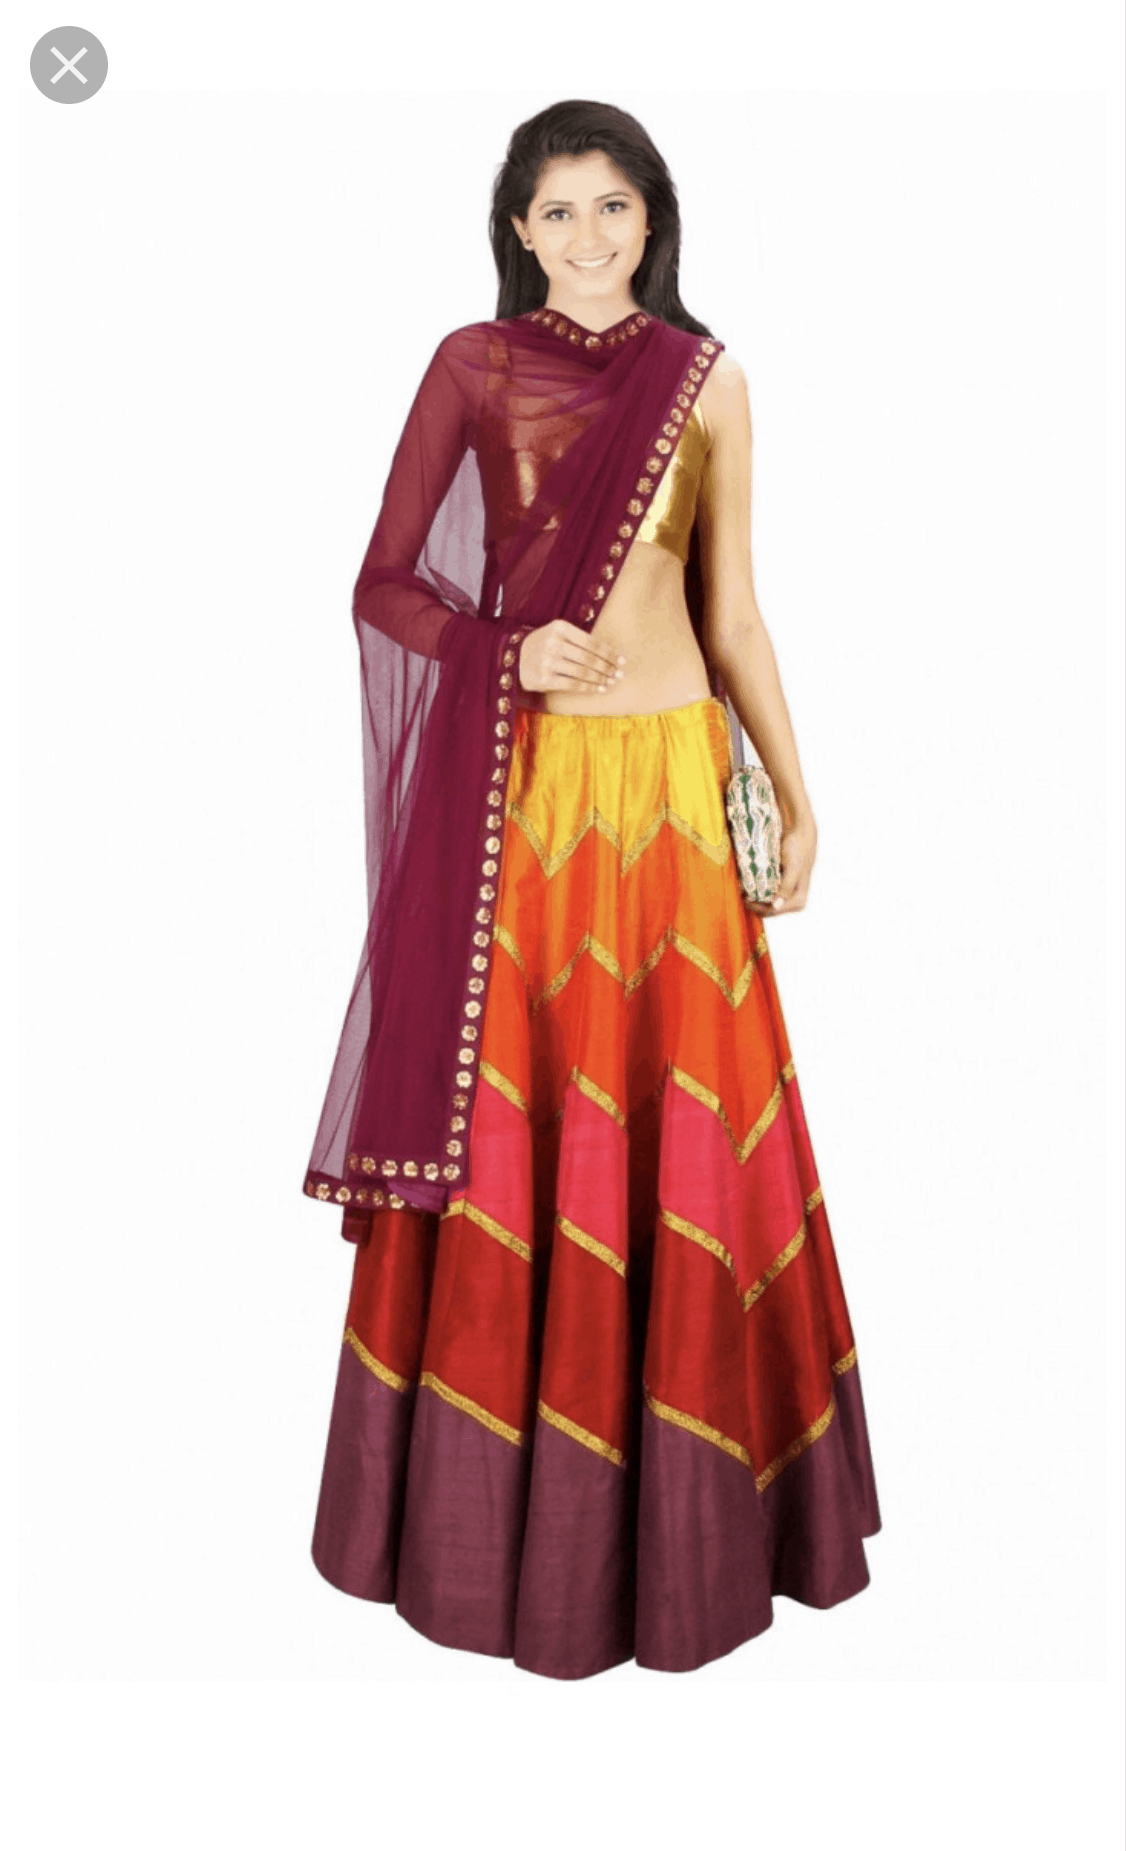


Whilst delving into the depths of t’internet, I discovered that you can buy lenghas in varying stages of completion – you can give your measurements and they will make it for you, for not a lot of money, or you can buy it ‘unstitched’. Now, I wasn’t sure whether by ‘unstitched’ they meant they will just send you the fabric, or whether it will already be partly constructed in some way and you have to tailor it to your measurements ??♀️ Google research didn’t really throw up a definitive answer, so I thought it best not to risk it and to just buy the fabric myself. You could buy the part stitched ones (and in some cases, the fully-stitched-to-your-measurements ones) for anywhere between £30 – £50, which works out about the same as I bought my fabric for, but where’s the fun in that?
In the end, I followed what seemed to be the general theme of the pictures I saw and bought a skirt fabric with a larger print, and a top fabric with a smaller print. Ideally, the gold motif would have been the same on both fabrics (but just larger on the skirt than the top), but that’s pushing it when you’re mixing and matching colours from different shops.
I meant to order the fabric over the Christmas break but New Year came around before I was ready for it, and once we were back at work and the bride reminded me how few weeks there were to go until the wedding, she lit a fire up under me. I realised that I needed to get moving – FAST – especially as I had to wait for the fabric to arrive from India. The two fabrics I ended up with were actually my very first choices – and despite MUCH browsing afterwards, they remained my faves. Nothing else I found compared to them, and I couldn’t get the image of them paired together out of my head (always a good sign that I’ve found the one).

When the fabrics arrived (both on the same day, both from India, but from different sellers – spooky huh ?), I realised immediately that the skirt fabric was 100% going to need a lining. It was rather see-through. It’s a medium weight fabric, but not decent enough to use on its own as a skirt. No biggie, I needed to buy some zips for the skirt and top anyway so I ordered some lining from Minerva Crafts – some of this lovely fabric which I used as lining in my Deer and Doe Opium coat. They had the lining in both pink and turquoise, so I bought both – figuring I’d probably want to line the top as well. In the end, buying the turquoise one as well turned out to be a very wise decision.

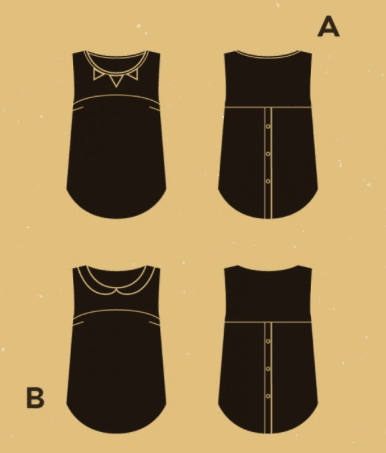
The top that came in the same pattern envelope as the skirt (view A) had a crossover strap back, which I didn’t realise until I looked closely at the line drawings. I wasn’t too keen on that, because it meant a strapless bra, which isn’t something that’s appealing to me. Watson bras (and other soft bras) all the way for me, these days. I figured that I didn’t have time to hold up the entire project while I found another pattern for the top, so with all my supplies gathered I got cracking on the skirt.
The version of the skirt that I made previously was pretty tight at the time I completed it, and definitely not suitable for a wedding where there’s going to be enormous amounts of tasty food. Not to worry, I thought ‘I’ll just make the size up’ right? I got out my traced pattern pieces to find that I’d previously made a size 10, which on the pattern envelope said was for a 25 inch waist. Lols, that’s why it was tight, then. Measuring my waist, at 29 inches I wanted the size 14. Unfolding the pattern sheets, I discovered that my envelope only goes up to size 12. Hmm. Not wanting to buy another pattern, my plan was to make the size 12 and to use half-inch seam allowances rather than 5/8 to give me the extra room, and if it was still snug I’d have to knock it down to 3/8ths.
The skirt was cut out, along with matching lining pieces. The skirt isn’t written with a lining (it’s intended to be made from decent-weight satin, like my original unlined version), so at the time of cutting I just cut two of everything, thinking I’d blag it during construction. I discovered that those little Clover clips have many uses – including holding shifty lining level on your cutting mat. LIFE CHANGING. ?? Obviously, this only works if your selvedge is still mostly intact, but I still felt like I was winning.
I began sewing the pieces together, actually mildly impressed that despite me not pattern matching AT ALL (that pink silk was pretty spendy so in favour of preserving funds, pattern matching was done away with) it doesn’t actually look like too much of a shambles. I intended to French seam the inside, but because of the front slit and side zip, it turns out I was only able to get at one seam. So one seam it was ??♀️

I knew the front pleats would be a little bit questionable over my stomach, and it turns out they absolutely were and they made me look pregnant ? So I turned them into darts… and topstitched them down on the front for good measure. There was absolutely, 100% not to be any unnecessary extra inches over my stomach, thank you. So let’s call them ‘decorative darts’ rather than ‘failed pleats’, yah? I ended up topstitching the back darts as well, for strength (because my ass was putting strain on them) and most of the seams of the skirt too (because my thighs were straining those).

When I say the skirt was a little tight I mean that I could hardly move in it. I let out every seam that I could get to, and after that, I could move in it but couldn’t sit down in it. I had two options, that I could see – lose weight (FAST) or unpick every seam of the skirt and squeeze a few millimetres from each to get the extra room I need. It was literally just around the bum that it’s too tight.
I then thought of two more options:
1. Buy Spanx
2. Re-cut the narrowest skirt panel (the panel just to the side of the slit) wider, to give the extra circumference. I had enough fabric to do this, but that meant unpicking my one and only french seam. And the waistband. Which seemed pretty long.
So rather than face the problem head-on, I avoided it and moved on to making the top instead while I debated the skirt dilemma.
For the top, I initially wanted to go with the princess seamed top that was included with the skirt pattern but got put off by the cross over straps at the back which meant it would be awkward as arse to wear a bra with it. Sari blouses seemed to mostly have sleeves, and be really fitted around the bust, which made me nervous that I wouldn’t be able to move my arms. I thought about making a Scout tee, as this roughly fit the shape I was after, but then realised the one yard of turquoise silk I’d bought was 45 inches wide not 60, so didn’t have enough fabric. Plus I thought it might be too loose-fitting and could look weird. I also considered the Gemma Tank, and the Ogden Cami, but dismissed both of those because they weren’t the style I wanted. Then I thought of the Deer and Doe Datura blouse – I’d made one previously, so already had the pattern kicking around (and traced, too, which helped as we were getting pretty short on time here). The only problem was, even if I cut the facings from the beautiful jade lining I’d bought to line the top with (the silk is a bit rough), I was just a smidge short on the fabric. I couldn’t fit all the pieces on, no matter how I tried. The fabric is directional as well, so I could only put the pieces on one way up.
The husbeast got dragged in to help, as he’s good with getting stuff to fit. Anyone remember that challenge on The Krypton Factor where they had to get all the weird shaped pieces to fit in the box? Well, the husbeast would have won that HANDS DOWN. But even he couldn’t find a solution for this dilemma… the fabric was JUST TOO SMALL. FFS.

So plan B came into action… the jade lining. Anyone remember my Deer and Doe Opium post where I said that the lining was so nice that you could totally use it to make garments with? Well, I took my own advice and decided to do just that. We started to think about which pieces of the blouse we could cut from the lining.

In the end, we opted for cutting both the front and back bottom halves from the satin. I was just going to cut the bottom of the back from the satin, and have the entire front made from the patterned silk, but this didn’t sit well with the husband’s OCD in terms of ‘side view’ so the decision was made to cut both the front and the back bottom halves. The husbeast also made the comment that the solid green on the front would break up the prints of the skirt and top, but I wasn’t too bothered about that. I was happy for the prints to be against each other, and after all, I had been told that more is more and wanted to follow this as much as possible, because when do I normally get to do that?!
So we cut.
The bias tape was also cut from the silk, but as I was cutting it I kind of started to regret it as the fabric was stretching out alarmingly ?
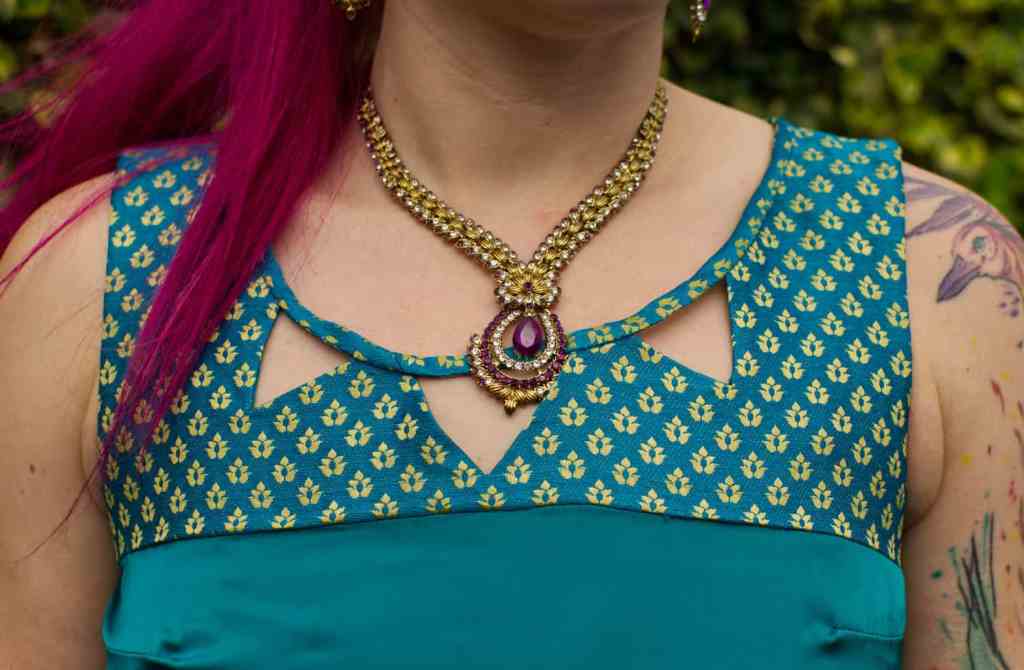
I was worried that all the snipping of the triangles on the front would not work well with this apparently very fray-prone silk, but when I was snipping it there didn’t seem to be too much drama thankfully. As I did with the first Datura I made, I marked the stitching lines around the points to make sure that they came out straight and even – eyeballing it would not have turned out well. It’s well worth taking the time to mark those lines to get a good even finish.


One thing that’s missing in the pattern instructions is to clip yo’ curves before turning the front and back pieces the right way out – you’ll get a much nicer finish, believe me, and plus it’ll look like this on the inside if you forget ?

The Datura is quite an enjoyable sew. I took a different approach to apply the bias tape for this second version – the pattern instructions tell you to fold the tape over the edge and then machine stitch through all layers. When I made my first one, I attached the tape to the inside and machine stitched, and then folded it to the front and machine stitched again. My reasoning behind this was that the first pass at least anchored the tape in vaguely the right place, rather than having all layers shifting around because nothing is held down. This time around, I did the first pass the same (on the inside, with the machine) but then I hand-stitched the tape down on the front. It gives a lot more control, and it’s kinda satisfying. I don’t actually mind hand stitching. When it came to bridging the gaps between the triangles, I invisibly stitched the two edges of the tape together. I’m pretty pleased with how it looks.


Last time I made the Datura, I clearly hadn’t quite figured out how to join bias tape in a circle because I just overlaid one edge over the other and just carried on stitching. It looked a bloody shambles. This time, I can see the improvements – the join looks fab, and the change in technique has given a MUCH neater finish. The whole neckline looks 1000% more professional than the last one ?? It requires a bit of eyeballing, but before you complete the circle of the first pass nip the ends of the tape right sides together, and stitch. This gives you a clean join on the outside, and the ends are neatly tucked on the inside.
I do wonder whether it’s actually worth faffing about with the method of making the straps the way the pattern is written, because you end up putting the bias tape over a nicely finished edge and covering it up. It feels like it would be much easier – and less bulky – to put the bias tape over a raw edge… but then the bias tape is really narrow and maybe there’s a risk of fraying or seams coming apart… and I’m not sure how the raw-edge method would work with the triangle points… I dunno. Just musing.
Annoyingly, a join in my bias tape landed right over the tip of one of the triangles, so it’s a little bit bulky at that point.
I remember re-doing the bias tape about three times on my first Datura, because the instructions say to ‘pull the tape tight’. Okay… how tight is ‘tight’? ??♀️ Thankfully, I got it right(ish) the first time on this one so no unpicking was required ??

I starched the back pieces to get the placket fold nice and crisp – working with satin is bad enough, but working with stretch satin is a bloody nightmare. Annoyingly, the starch marked the fabric so the top needed a rinse before I could wear it.

When it came to hemming the top, I realised I’d only made bias tape for the neckline, not the hem as well, so I had a bit of a dilemma.
I considered my options. I could:
1. Use a green satin bias tape that I had kicking around, which wasn’t *quite* the same shade as the main body of the top, and it was too wide as well so I’d have to do some trimming and faffing to make it narrower
2. Just grow a pair and make more bias tape using the patterned silk from the top section of the blouse.
I knew I’d just be annoyed with the mismatched green, so I grudgingly cut more bias from the silk. I dug through boxes and boxes to find my 12mm bias tape maker and calculated the width of tape I’d need to cut.
Now I have no idea what happened to all my rational thinking here, but in my mind, I went ‘okay so the folded tape is going to be 12mm wide, plus the little flaps on the inside of 6mm each so my strips need to be 12 + 6 + 6 = 18mm wide. It wasn’t till I tried to feed the cut (and joined ??♀️) strips through the bias maker that I realised that 12 + 6 + 6 IS NOT 18. FFS. Of course it’s bloody not. It’s 24. Why I didn’t just go ’12 doubled is 24′ rather than complicating things by calculating flaps I have no idea. So I had to go back to the cutting board and cut the correct width. Thankfully there was enough fabric leftover. Even the second time around though, it wasn’t quite as wide as I’d like – I cut 25mm/1 inch strips for the 12mm tool and it was a good 3mm too narrow ??♀️


So after all that faff, the bias tape is a bit wibbly around the hem, and a little bulky, but the top is going to be tucked in so it doesn’t matter *too* much. I am, at least, proud of the fact that I made the match-matchy tape rather than slacking off with the pre-made polyester satin stuff.
On rummaging through the button tin, I found two options for the button closure down the back:

My eyes preferred the fancy ones, but I was concerned that they were just a little too much for the lightweight satin. They are shank buttons as well, which means they would stick out a fair bit, and I learned from my first Datura that sticky-outy-buttons on the back = ouchies when you lean back against a chair. So I played it safe with the flat shirt buttons. If you follow the pattern instructions, you will sew the back plackets closed – as in, there are no buttonholes, and the buttons are sewn through both layers of the back so you can’t undo them. They’re fake buttons. Fakers, I tell you. I discovered – the hard way – that if I sew the back closed, I can’t actually get the top on and off, so plackets for realzies it had to be.
With the wedding day rapidly approaching, at least I now had a top. I tried it on with the skirt and it looked amazing – apart from the fact that the top was just a smidge tight across the bust (I could have done with sizing up, it seems), and the skirt still didn’t fit my ass. I even let out another few mm on some of the skirt seams where I could, and it was still pretty snug. That meant only one thing. I hauled myself into the city and bought some ‘control’ tights to try and hold everything in, which helped enough to get me into the skirt on the day.
See how desparate I got with the letting out of the seams?! ??

The skirt closes with an invisible zip (‘sort-of’ invisible in my case), and two hooks and eyes on the waistband.
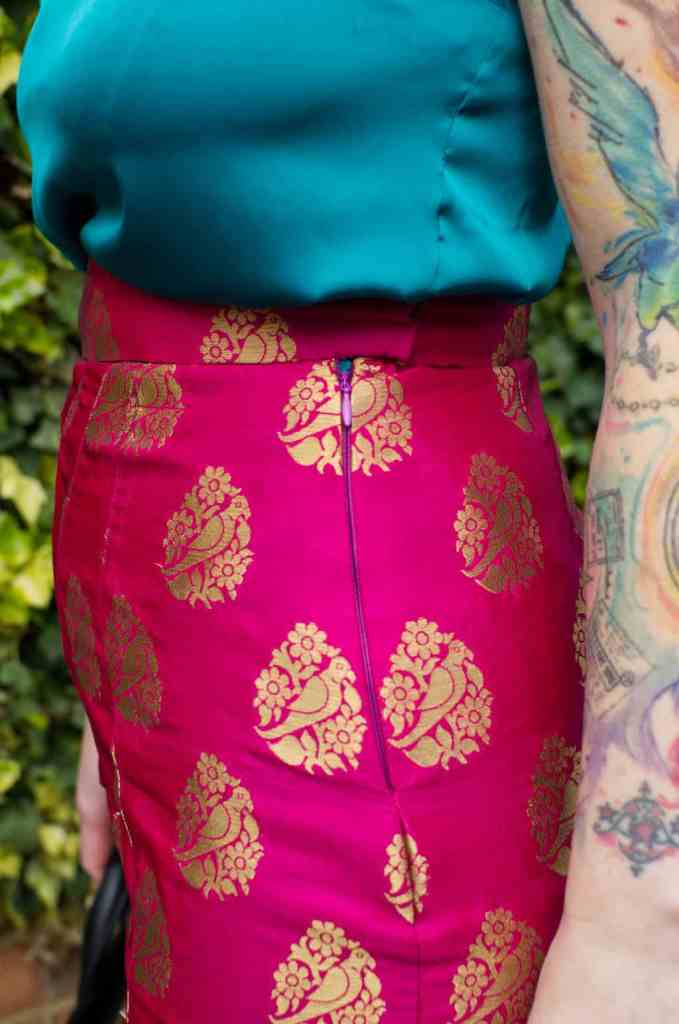

Enormously glad that I decided it would be a good idea to interface the zip seam with some silk organza, to help take the strain…

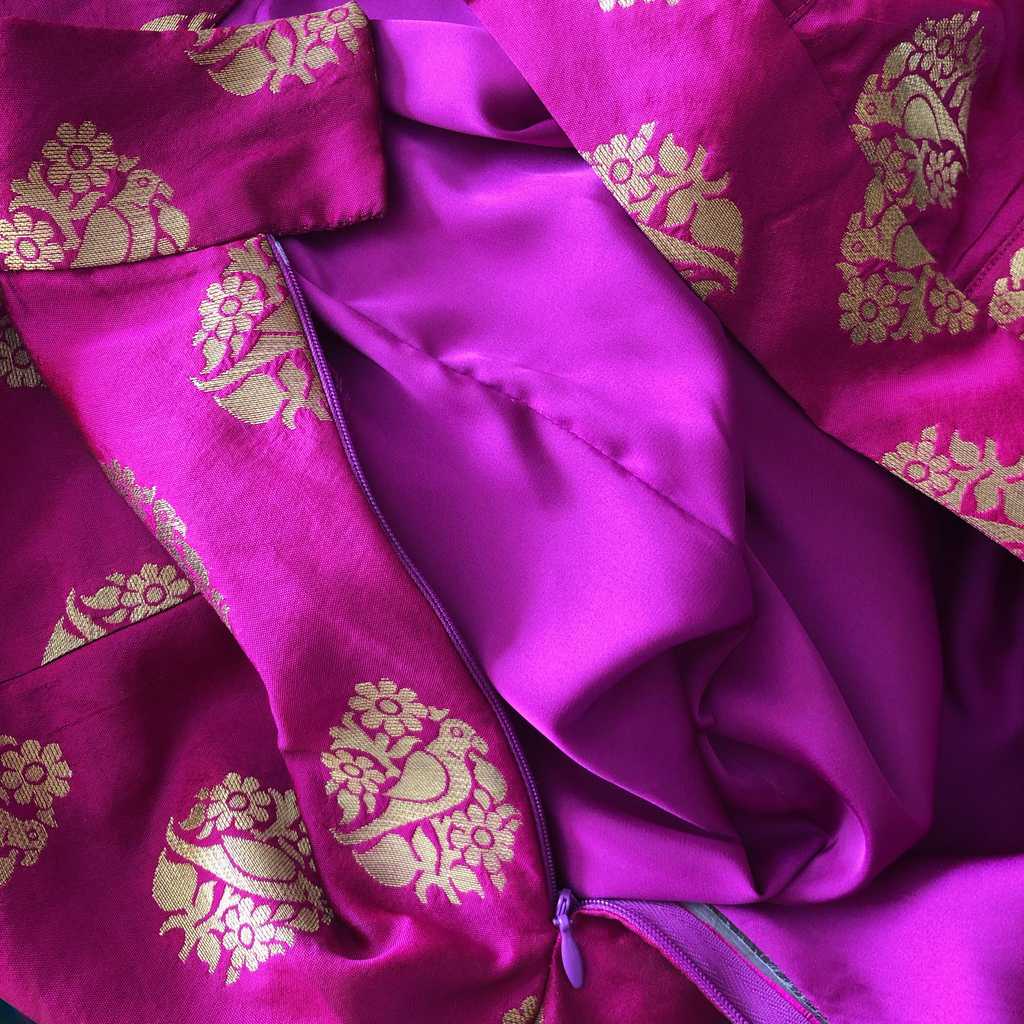
And as a preventative measure, I also reinforced the top of the thigh slit.

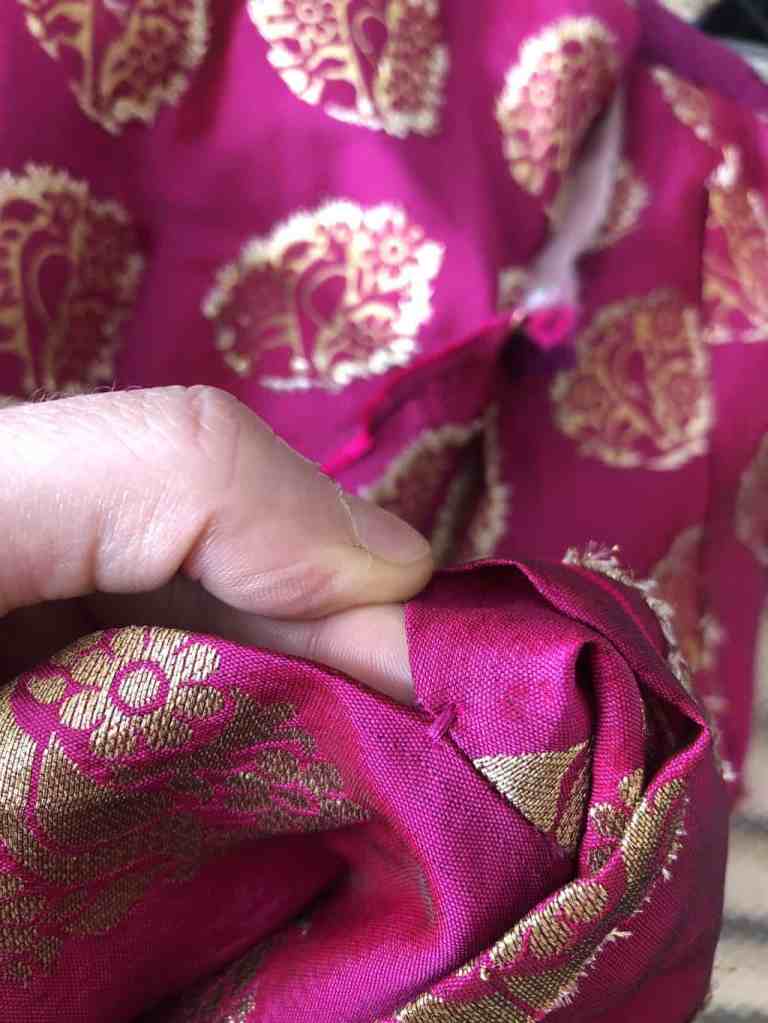
The bride lent me some of her jewellery to complete the look, and I went with my matchy-matchy gold shoes and bag, because gold ?

I love my outfit, but wish I’d have made the top one size bigger, and the skirt about a hundred sizes bigger. I really like my first Datura which was made in a solid colour, but the colour blocking on this one I don’t think is flattering on a bigger chest. I’m not sure whether it’s the satin over my boobs (something to do with shiny fabric??) or whether it’s the colour blocking, but I’m not loving it. The darts are a bit wrinkly at the ends, too.
After all the faff with my outfit, Aaron discovered he didn’t have a suit that fit him so we had to get a next-day ASOS delivery of the best options they had. In the end, he went with a pretty cool tapestry number, and of course I was turning up the trouser legs in the hours leading up to the event ?

(and I hate to disappoint you guys, but he’s since considerably trimmed that beard and moustache. Yes, it looks super cool, but turns out it’s a pain in the ass to maintain and keep food out of).
The evening itself was a total riot of dancing, colour, food and beautiful fabrics and jewellery. The husbeast has said that if we ever renew our vows, he wants an Indian wedding. This may or may not have something to do with the fact that the groom was wearing a velvet jacket, and the husbeast lurrrrrrves a bit of velvet. I’m happy that my outfit blended in with the other Indian outfits that were there – I even saw another lady in a beautiful pink and turquoise ensemble. I may not get many occasions to wear my get-up, but it’s gonna remain in my wordrobe until the next one comes!

So without further ado, I leave you with many – many – photos of this outfit. The ones with the pretty flower background were taken at the event itself (hence the dodgy-iPhone-quality), and the clearer ones were taken pre-event, courtesy of the wall over the road from our house when I realised there was no chance I was gonna get this dressed up again after the event to take more pictures for the blog ?
Oh! I almost forgot – I managed to snaffle my photo with the beautiful bride, check out the gorgeous outfit she’s got going on! ?


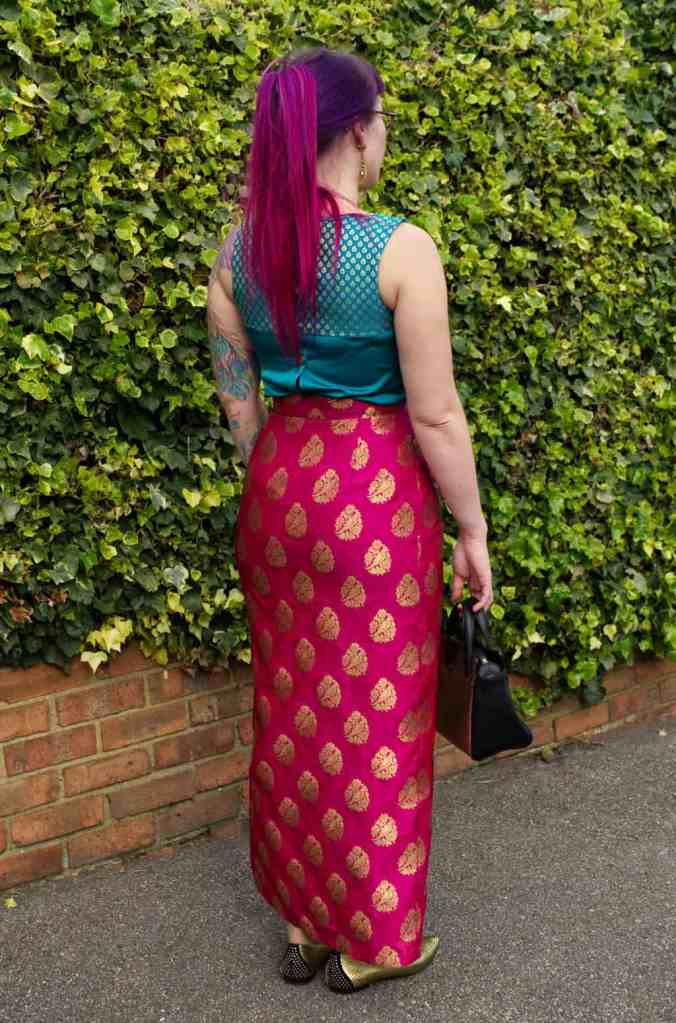


Thanks for making it to the end guys… that was a lonnnnng post! Though, I guess that’s because you got double prizes – two garments in one week! ??
Next week on the blog, I’m talking about the pricing of handmade clothing and goods – I originally posted about this two years ago (almost to the day!) but that original post is in need of a revamp now that I’ve got a couple of years of Etsy selling experience under my belt (and because a lot of people still talk the pricing issue on social media groups). I’ve got more to say now, so it’s had an update to ensure it’s still relevant! ?
Subscribe below to make sure you don’t miss out! ??
14 responses to “The Darjeeling Limited”
Wow … the finished result is a huge success. The fabrics and design are exquisite. You look beautiful in your photos. It amazing how patterns can be adapted to suit different situations with a little creativity and different fabric choices. You have done a wonderful job. Thank you for sharing your experience, it was lovely to read.
LikeLike
Ahh thank you Janet! I’m so glad you enjoyed the post (and well done you for making it to the end… it was a long one lol!) I always find that I have to ‘look past’ the styling of the garment on the envelope, as they can be quite frumpy or just not really my style. I was so happy with the finished outfit, I felt a million dollars in it! ?
LikeLike
Wow, this is stunning! Love how you overcame all the wee obstacles and cane up with an incredible outfit. Sounds like an amazing celebration as well! ?
LikeLike
Thanks Heather! Haha, yes there were MANY obstacles lol ? It was a great party, and I was proper chuffed to have such a lux outfit! ?
LikeLike
Absolutely love this fabric combo and the the datura top is a perfect style for the occasion. I’ve not made one yet but you’ve definitely inspired me!
I always have to stitch down any pleats at the waist too- unless I make a much much larger size and go with the slightly oversized look- otherwise my hips just pull them into weird places!
Hope you do get a chance to wear this again- especially the top- as it’s beautiful! X
LikeLike
Ahh go for it Sarah! The Datura is an excellent pattern, just as comfy as a T-shirt but a little bit more dressy. Pleats are just a nightmare aren’t they?! I keep seeing those paper bag waist trousers, and have to keep telling myself that they will NOT be flattering on me no matter how good they look on others ?
LikeLike
That is a gorgeous outfit. Oh, all that fiddly bias tape! It’s worth it for the final effect, though. I hope the bride mentioned how fab you looked. Her outfit was pretty amazing too.
LikeLike
Thanks Fiona! All the drama was definitely worth it in the end, I loved my outfit! And yep, a LOT of fuss was made over my outfit – many compliments from strangers who were aware I’d made my outfit, apparently the bride had been telling everyone in the run up to the wedding that I was making an outfit for her special day! ?
LikeLike
WOW! You look awesome! As does hubby and the bride is just stunning! I love your colour choices. Your hard work defo paid off! x
LikeLike
Thanks Kat! I’m really loving the pink/turquoise combo of my outfit… just wish I’d made it a little bit bigger ? The husbeast’s suit is really something isn’t it! ?
LikeLike
Beautiful, I love the whole outfit!
LikeLike
Thank you Sarah! ? The whole evening was a total riot of colour and sparkle, it was amazing!
LikeLike
Thanks for the exciting meaty post! I’m glad you rose above all the tribs…you look beautiful!
LikeLike
Ahhh yay I’m glad you enjoyed it! ? Sometimes when I start talking I find it hard to stop ??
LikeLike