Wow, how are we in May already?! This year is going by at a crayyyzeeeeee speed amirite? 😨 I mean, I’m sure that the current state of the world has something to do with that, but still.
With the ongoing WFH situation, I’m very much staying firmly in the ‘loungewear’ section of my wardrobe, and that’s not very big. A fair few hoodies and sweatshirts, but only a couple of pairs of comfy bottoms. It’s certainly not as varied as I’d like, so I’m continuing to work on that – albeit very (very) slowly (and by very slowly, I mean I’m still in the pattern-scouting stage, no sewing has actually taken place). Joggers are definitely on the horizon, though. My Lindens, on the whole, do get worn – and my fleece-backed pink one is usually warm enough to not want to wear a t-shirt under it, but that wide neckline bothers me when I see either a t-shirt collar or bra strap poking out from it 👀

I had that same issue with the Volt sweater I knitted. The neckline on that is way too wide as well. But hey – lesson learned for the future 💪🏻 (on a side note – WHY does a boat/wide neck even exist?! The same for lacy yokes – I do NOT want the faff of having to find a flesh-coloured bra to wear under it. Eugh, effort.) Having finally found a garment that gets worn both at home and at work – the humble sweatshirt (which makes me sound like a proper slob 😂) – I wanted to try out some different sweatshirt patterns to see if there was better out there.

I looked at a few brands, and there seems to be no shortage of sweatshirt patterns out there. In the end, I went for the Wardrobe by Me Boxy Raglan Sweatshirt, and bought some sweatshirt fleece fabric (which is more like a really heavy jersey) from Minerva. It’s definitely heavy enough to be a sweatshirt weight, but not as heavy as some of my store-bought hoodies. And it’s very stretchy, unlike the last sweatshirt fabric I bought from Minerva, which only stretched in one direction. This one stretches in all directions, which is good – I’ve learned that not-very-stretchy fabrics cause havoc when it comes to cuffs and neckbands 😑
You get three different neck openings with the Boxy Raglan pattern, in varying degrees of wideness, so obvs I went with the narrowest now that I have furious hatred of boat necks 😂 I made no adjustments to the pattern and even though I technically should have graded up a size based on my hip measurements, I went with the specific instructions to cut the size based on my chest measurements.
Even though I’d bought plain fabric (which was a far cry from the super lairy Linden that hit the blog a couple of weeks back), you know that I just couldn’t bring myself to leave it plain 😏

For as long as I can remember, I’ve not watched much TV. Films, absolutely, but TV shows, not so much. Except for one show. I’ve been a hardcore fan of Friends since I was a teenager – possibly even before that – and in fact, we are now mid-way through watching all the episodes (again) chronologically from start to finish. I’ve lost track of how many times I’ve done that through the years – first I watched them on VHS, then on DVD, now we are streaming them on Netflix. I still love them just as much as I did when I was younger, and there’s absolutely no other TV show or film that makes me laugh as much as Friends does.

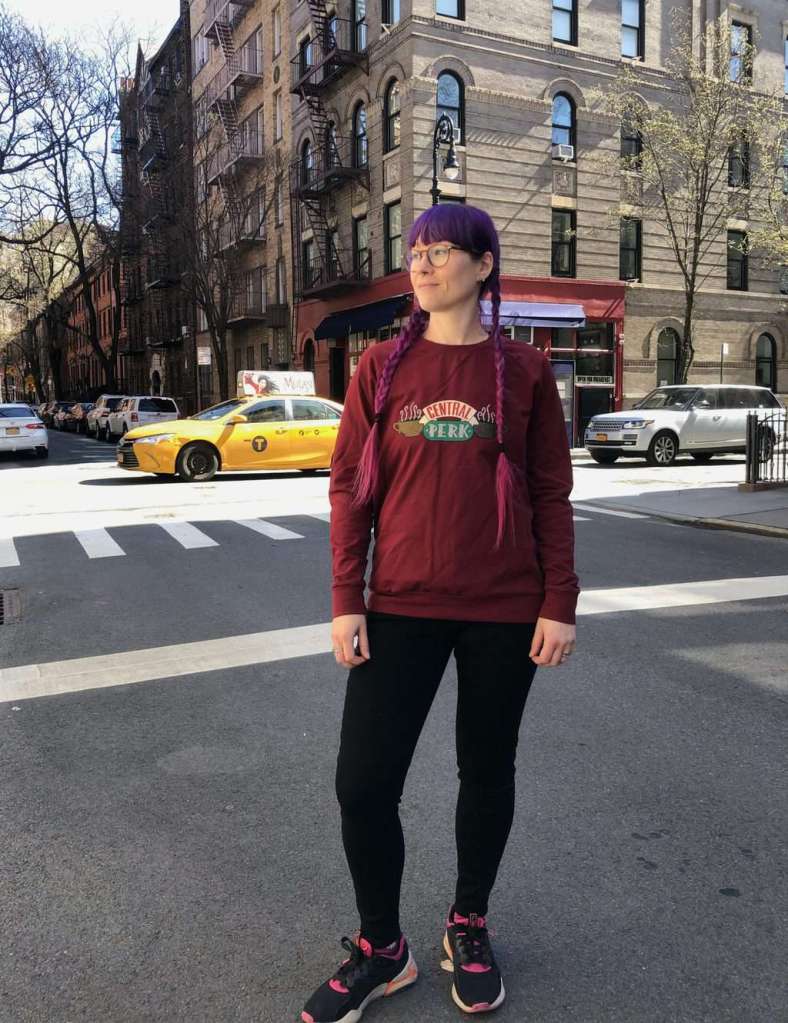
So, what better way to jazz up my plain sweatshirt than with the Central Perk logo? I had an upcoming trip planned to NYC, so the timing couldn’t be any more perfect 👌🏻
The Cricut Explore Air 2 machine got called into action, to help bring my idea to life.
I got an SVG/cut file off Etsy of the Central Perk logo, and used the Cricut Design Space software to break it up into the different layers and colours that I wanted. I really struggled to find the right colours for some of the elements – even with the Cricut vinyl that was available at Hobbycraft (it seems that there aren’t many shades of brown to be had) – so I dug through my stash of iron on and did the best I could rather than buying a whole roll just to use a tiny square of it.

The digital cutting file came with the layers cut out just as outlines rather than solid shapes (meaning that each piece needed to fit perfectly inside the others to create the picture, like a jigsaw, rather than sitting on top of each other in layers) but I knew there was NO WAY I was going to get all of those lined up perfectly and the potential for it looking a shambles was dangerously high. I did some googling and found out that there was indeed a way to fill in those gaps, to create the solid filled shapes that I wanted, so I had a stab at it and layered everything back up so that it looked how I wanted. I’d gotten a bit keen with filling in too many bits (the gap in the cup handles, for one) so put it right and repeated the process until I was happy.
Then came the actual cutting ✂️


I merrily cut out all of my pieces of vinyl and lined them all up on the cutting board ready to go, and then realised my error – you have to specify what type of vinyl you’re using before you cut – via the settings on the machine – so that it knows how much pressure to cut with. And that same setting applies across the whole cutting mat, so you can’t use a mixture of materials that all need a different cutting pressure all on the same mat. I was using a combination of glitter iron-on, everyday iron-on and sport flex iron-on, because that’s what I had available – and yep, you got it, all three have different pressure settings 🙄 Because I couldn’t bring myself to unpeel all the pieces from the board after I’d just spent ages lining them up, I instead left all of them on the board but removed some of the elements from the cut file on screen. It took three rounds of cutting to get them all cut out (well four, actually, because despite my precise(ish) layout, the placement of the red vinyl for the ‘central’ text was slightly off and it missed a corner of one of the letters 😤)

Once I had all of my pieces cut out, I was excited to start ironing them on to the fabric. But first, I layered them up to see if I liked the way they looked together – because once they were ironed on, there was no going back. If I wanted to change the colour of one of the pieces, now was the time.

Lookin’ good! I was happy.
Different types of vinyl have different temperatures they fuse to fabrics at, so I had to keep checking the heat guide for each bit that I applied. The Sport-Flex piece (the gold behind ‘central’) ended up wrinkling a bit with each subsequent fuse, and the green behind ‘Perk’ actually shrunk a little by the end of it (and annoyingly, you can see a millimetre of glue around the edge where it’s shrunk). Perhaps I should have reduced the fuse time a little for the bottom layers because they were going to be fused essentially about four times over by the time I’d finished… I guess I should have really thought about that before I started, but hey – making the mistakes is the best way to learn 😂

You have to cover up as much of your garment as possible with paper or card or just something, so that you don’t end up with a massive burn mark from the heat press. Yeah, ask me how I found that one out. But what you also have to cover is any of the vinyl that you’ve already applied, because it’s even WORSE if you put the heat press directly on that. To get around that, I just reused the clear plastic liners from the pieces I’d already fused, and it seemed to do the job. Here’s my process, in a nice little series of photos 👀


The finished design looks okay, but if I did it again (and I did think about re-doing it) I would possibly use less glitter vinyl and maybe make the whole thing a smidge bigger. You can see how badly that gold SportFlex wrinkled after a few presses, and glue started to ooze out of the edges of some pieces, which of course the stray glitter from the other bits made a beeline for and is now stuck to permanently 😑

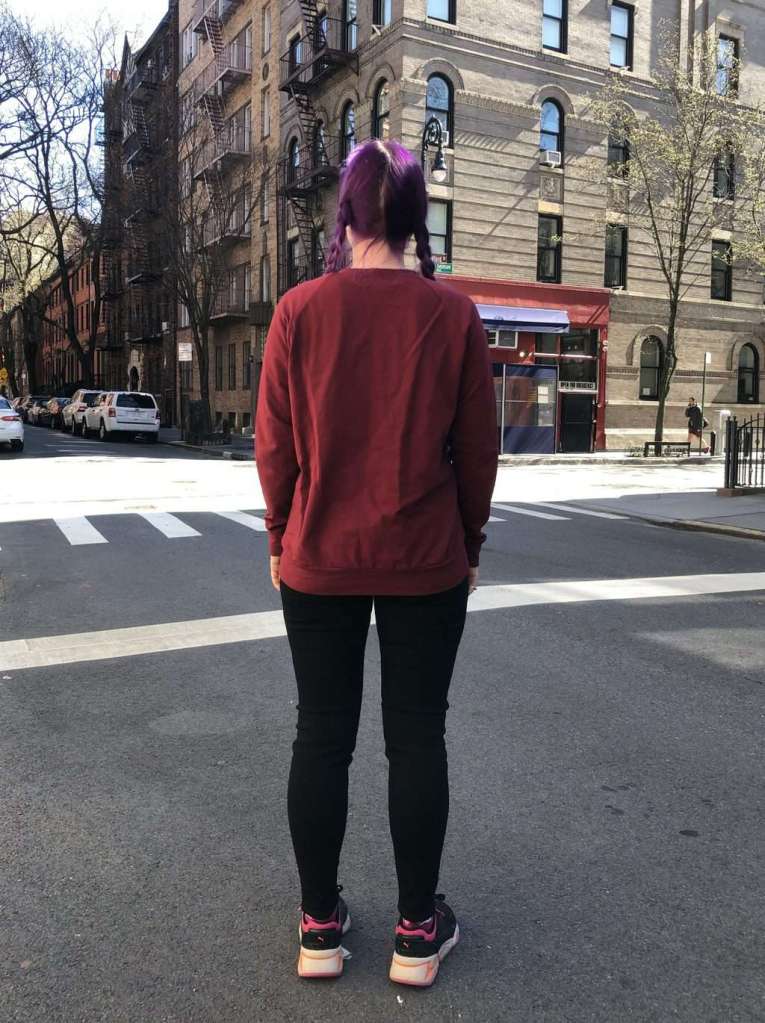
With that done, I began the sewing. I whizzed the pieces through the overlocker – I LOVE that sweatshirts are so quick! – and tried it on. Disappointed was my first thought – the body was okay (though I wish I’d put the motif just a *smidge* higher as I now have coffee cup boobs) but the sleeves were too long and baggy, and the neckline stood up weirdly. Hmm.

I mooched downstairs to the show the husbeast who confirmed that yes, the sleeves were a bit long and baggy, and yes, the collar did look weird. I moaned that I wanted to wear this for work and now couldn’t – because it looked like a bit of a sack on me – and he tried to soothe me by saying I could instead wear it at weekends, to the cinema, and on Sweatpants Sunday. I guess so 🤷🏻♀️

It was as I was folding away the pattern pieces in my little strop that I realised that the sleeves were long because I’d not cut the hem at the correct line on the pattern piece. FFS. They actually needed to be about 3/4 inch shorter. Not that that would have fixed my *entire* length issue, but it certainly would have helped somewhat. The collar, I didn’t know what to do with. I sewed it at 1/4 inch seam allowance and then realised it was 3/8 when I was putting the pattern pieces away, so I should have gone round and taken another 1/8 off. I wasn’t convinced it would have made much difference, though. I felt like the collar was too long for the neck opening – because I definitely didn’t have an issue stretching it around – and that would have explained the standy-uppy-ness as well.
I toyed with the idea of unpicking it. I hate unpicking overlocked seams. But it did look shocking… 👀
I unpicked and restitched it. Does it look better? Yeah, kinda. The body is a bit wrinkly though, directly under the seam, annoyingly just on one side though 😑


But, I finished the thing, and I even walked to the ‘Friends building’ in lower Manhattan just to take these photos. I mean, there’s nowhere else that would have been as good a backdrop, right?! And when I say the Friends building, I mean the real-life apartment block that got used for every exterior shot of Rachel and Monica’s. Yes, I’m a total Friends nerd and I’m not ashamed of it one bit 🤓

After my grumbles about the neckline on the Linden, I think I actually do prefer the fit (body-wise, at least) of the Linden to the Boxy Raglan – and I do wear that for work. But, the neckline is *much* better on the Boxy Raglan. I’m thinking that I might do a Linden but with a Boxy neckline – that would be perfect for me, fit-wise! I’m also looking at this pattern from Stoff & Stil as a potential one to try, which of course I’ll report back on 🤓
The lines on the pattern piece are EXTREME. I mean, a different colour for each neckline wouldn’t have gone amiss – it was damn near impossible to find the line you wanted!
This sweatshirt is truly boxy, that’s for sure. For me, I’d definitely say its more of a Sweatpants Sunday at home kinda look, rather than something I’d wear to work. In hindsight, the glitter vinyl was a bad move for many reasons – it makes it look a bit like a Christmas jumper, and, as I discovered when taking these photos, if my hair is hanging down in front of me it catches and snags on the rough glitter vinyl. Awesome.

Sewing is sort of happening again. I’ve made me and the husbeast an Inside-Outside Pouch each, to keep crafty things in, which I really enjoyed. I’ve got a turtleneck Kielo that’s almost finished – it just needs the hem and cuffs whizzing through the coverstitch – so I might finish that off and see if the ‘quick win’ rush spurs me on to anything else. I’ve started sewing the Neptune Tee from See Kate Sew (okay, so only the sleeves so far, but I’ve MADE A START), and I cut out and even started sewing a summer dress pattern with some tie-dye rayon I’ve been dying to use. So, nothing major, but I’m pleased to report that there has at least been developments. I’ve just finished off *another* pair of knitted socks, too (and I have two more pairs lined up – I’m properly addicted 🤪) and I’m making damn good progress on the absolutely savage fifteen inches of stockinette for the body of my Sorrel Sweater.
I also really want to make a start on my Skyline Quilt… but yeah. That ain’t happened yet. One thing at a time 😂
Anyway. Enjoy these pictures of me nerding out in my Central Perk sweatshirt, and if you have any pattern recommendations for sweatshirts that don’t have a ridiculously wide neck opening – lemme know!
Happy Sunday ✌🏻


Next week on the blog – I managed to get a Grainline Scout Tee out of a metre of Liberty fabric that I scored in the sale, and I’m pretty happy about it 🙌🏻 Oh! And it seems to be Me Made May as well, so let’s talk about that too 😆 Subscribe below to have the post drop straight into your inbox 🙌🏻
WANT TO SEE MORE?
Enter your email address below to receive fabulous new posts direct to your inbox! No spam ever, just handmade awesomeness for you to enjoy.

20 responses to “We Were On A Break”
It’s cute! I love the logo 😊 I made a raglan jumper that’s basically identical to the Linden but with a narrower neckline from a Love Sewing free download here:
https://www.lovesewingmag.co.uk/downloads/item/love-sewing-issue-45/
Might be worth a try and it’s free? 😊
LikeLike
Thanks Romy! 💜
Ooooh yay for free patterns! Thank you for this 😘
LikeLike
It looks great and I agree the neckline is better than the Linden. Its very refreshing to read about am experienced sewers struggles as quite often all you see on FB is how great stuff turns out – 6 weeks of French Lockdown (no work either) and I still have little to show for all my failures! Love reading your blog as its honest and helpfully detailed. I might feel inspired to deal with the invisible zip situation in my sewing room today!
LikeLike
Thanks Jennifer! Ah, yeah, that old problem. Too many sewing accounts/blogs I see just focus on pictures of the finished thing, without any details of what actually went into it. To me, the finished item is just the very tip of the whole process, so I like to talk about it from start to finish, problems and all. There’s a learning curve to be had with sewing – one that never ends no matter how experienced you are – and I think it gives the wrong impression to make out that everything turns out well 100% of the time!
Eugh, invisible zips 😂 Do you have an invisible zip foot? For ages I never had one, because I didn’t realise that it was a thing, and it’s so much easier with the foot! Happy sewing 💜
LikeLike
Your sweatshirt looks good and I’m impressed with your skills. I’m toying with the idea of buying a heat press, but I’m not sure if I’d use it enough to warrant it. I’m a devil for buying gadgets that don’t get used after the first flush of excitement; I have cupboards and shelves full of them.
My sew-jo is low at present, too. I don’t know why. Usually I can’t wait to get over to my studio, but I haven’t set foot in there for a few days. That hasn’t stopped me from ordering supplies online! I think it may be because it’s a bit untidy in there and needs a sort out. It’s not too bad and won’t take long. It’s mostly piles of UFOs and projects prepared, or fabric ready to be prepared, lol. I also want to remove a broken table (my fault it’s broken. I dragged it while it had items on top) and replace it with a chest of drawers that’s currently in another room, but I need the hubster to help with that and he seems strangely reluctant. Maybe I’ll pull it all out into the kitchen and then he’ll have to help if wants any dinner tonight. I can be evil 🙂
LikeLike
Hi Bren!
Hmm, I guess I have mixed opinions on the heat press – it IS fun, and it’s great to be able to have the opportunity to use it when the inspiration strikes me, but they are expensive.
I feel ya on the low motivation. I don’t know what it is, either 🤷🏻♀️ It’s just meh. Did you manage to have a good tidy up and get back in there?
I’m still yet to start on my quilt kit, which I’m really excited about, but to be honest that’s more of a ‘free time’ issue than a motivation issue!
Did you get your table fixed? Is the husband still waiting for his dinner?! 😂
LikeLike
That cricut machine looks like a pita to use, and creates so much waste The sweater looks good, though! If I had the patience to do it, I’d embroider it instead, with a thicker yarn. I would probably finish it just in time for my 50th birthday (I’m in your age ballpark). Yesterday I picked up some trousers I started working on 15 years ago and I had put on so much weight the back rise is actually really low now 😦 But to be honest, I was surprised I got them over my thighs. Granted they were a corduroy baggy grandpa style back then and a really fitted style now… 😀
LikeLike
Ahhh an embroidered version would definitely look amazing – I think that’s a bit out of my skillset though! And yeah, it would take ages 😂 I love a good pair of corduroy trousers! Are you going to finish them off?
LikeLike
Wouldn’t mind making a sweatshirt but thought they would be complicated. Thanks for the tips on fabric for necklines and cuffs. Do you send for samples before you buy your fabric online. I’m always nervous. Love the finished product though. 😃
LikeLike
Ahh give it a go – you’ll be pleasantly surprised at how easy they are! But yes… BUY THE RIBBING lol. Buying fabric online can be a bit of a minefield – if there aren’t many photos of the fabric, or if the description is a bit thin on the ground, I’ll look to buy from a different shop. I only tend to send for samples when I’m *seriously* particular about the colour – burnt orange is a nightmare for me because sometimes you end up with ‘you’ve been Tangoed’ or sometimes you get brown! Samples are a good idea if you’re unsure though, and it is something I’ve done before. That odd pound or two spent on a sample can sometimes save you spending out on a fabric that isn’t quite the weight/colour you wanted. Happy sewing!
LikeLike
Love your sweatshirt. It looks great, especially with the Central Perk Logo. One option you might want to consider for the neckline, wristbands and bottom is to buy matching ribbing at the same time as you buy your fleece. I used to sew sweatshirts all the time and always bought the fleece with a matching ribbing. Works a treat and you’ll never have a stretched neckline.
LikeLike
Thanks Helene! I struggle to find places that sell the matching ribbing – do you recommend any good online stores that do this? I recently got matching ribbing from Stoff and Stil and it was the best thing ever!
LikeLike
Have you considered the Jarrah sweatshirt from Megan Nielsen? It’s my number 1 go-to pattern for sweatshirts and the neckline is just superb. I’ve made about 10 versions of it so far, all in view A because I like the classic retro style best out of all the options. I lengthened the bodice as otherwise it’s a tad cropped, and sized down about 5 sizes because it’s meant to be boxy and roomy, but I find it very flattering. I was torn between that and the Linden but the wide neckline on the Linden really put me off.
LikeLike
Ah thanks Alice – I hadn’t seen that pattern! Wow you get a lot of variations with it!
How do you find the neckline on it – from the photos on the pattern website it looks quite wide? I really like that the neckband itself is quite wide… it’d look good in a contrast ribbing I reckon!
LikeLike
Have you seen the Named Sloane? I’ve made it a couple times and really love it, especially the darts!
LikeLike
Ooh I haven’t actually – and I quite like Named’s designs too! The Kielo is my favourite!
Wow those bust darts are pretty cool. I like the kind of cropped, but still fitted look – it feels to me like a bit more of a smarter take on the sweatshirt? This could be one for my work wardrobe… I’m gonna give it a go! Thanks! 💜
LikeLike
I think it’s super fun and cute, well done! I have a Cricut I’ve used only for paper (which I pronounced Cry-cut until I realized it was Cricket, so now I…uh…still call it that anyway) and you’re slowly but surely convincing me to try vinyl. If you ever wanted to try again the logo would be just perfect on an apron! You could be a Central Perk barista!
LikeLike
OMG I said Cry-cut for like, aaaaaages haha. It’s a hard habit to break 😂
Why have I not thought of an apron? That is an awesome idea!!! 🤩
LikeLike
I like that you share your failures in such detail. So many sewing bloggers don’t share this level of detail and it’s super-annoying!
LikeLike
The failures are part of the journey, so they gotta get their time in the spotlight too! Agree that it’s frustrating that hardly anyone seems to highlight what went wrong. I wonder why? I mean, no one’s perfect, so they MUST have some fails, and why not talk about them? Getting things wrong is how we learn and get better, so it’s nothing to be ashamed of, and you might help someone else that’s either made the same mistake and isn’t sure how to fix it, or you might stop them from messing up in the first place! Only good can come of sharing the disasters, imo 🤷🏻♀️
LikeLike